
golden teacher spores uk : Everything You Need to Know
Hello everyone! Hope you guys are doing good. Today, in this article you will have a closer look at the golden teacher spores uk . I will try my level best to provide you everything you need to know about this topic.
This article will focus on what exactly golden teacher mushrooms are, their background, where they come from, how do they look like, their characteristics, how can you grow them, and more details on many similar features.
What Exactly golden teacher spores uk Is?
golden teacher spores uk belongs to the species of psychedelic and is also known as psilocybe cubensis. Psilocin and psilocybin are two major active elements of psychedelic. Golden teacher mushrooms strain has always been a favorite among growers for years.
Both Cultivators and Psychonauts love golden teacher mushrooms because of the fact that they grow quickly and their psychedelic journey have a profound impact respectively.
Psilocybe cubensis species is very easy to cultivate in the home setting and is widely distributed. This is the reason this species is among the well-known psilocybin mushrooms.
History of golden teacher spores uk
In 1906, this species was described for the very first time by Franklin in Cuba as Stropharia cubensis. Almost one year later, Narcisse Theophile identified it as Naematoloma in Tonkin.
Whereas, in 1941, it was named Stropharia cyanescens in Florida by William Alphonso Murrill. After that in the middle of the 1980’s, it was given the name Psilocybe cubensis. sterilized and raw mushroom growing
This information spread around quickly because of their look like a yellow cap. They are elegant and quite large in comparison to the other types of psilocybe cubensis.
Psilocybe is derived from the Greek word Psilos that means a thing with a bare head whereas Cubensis meaning is coming directly from Cuba. Some strains of psilocybe cubensis are commonly known as penis envy due to their shape.
Where Do Golden Teacher Mushroom Come From?
It is among one of the most popular psychedelic fungi loved by growers and shroomers at the same time. There are various facts about golden teacher mushrooms that play a key role in their popularity.
Psilocybe cubensis strain is considered as so special by the cultivators due to the fact they have an air of mystery. The exact origin of golden teacher spores uk is still unknown but they are highly recognizable.
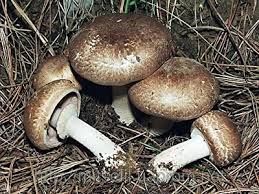
How Do Golden Teacher Mushroom in the uk Look Like?
Golden teacher shrooms consist of a fruiting structure having a partially covered cap with a golden or yellowish colored center. This cap is elegant and larger as compared to any other type of psilocybe cubensis.
Their cap size can be reached up to 8 centimeters in diameter. Their structure has a hollow stipe that is quite thicker towards a base. Golden teachers also have gills and they may vary between white and purplish brown.
Dosage of golden teacher spores uk
A recommended dosage for dried golden teacher spores uk is ranged between 1 gram and 2.5 grams. This amount of dose could be small for regular and experienced shroomers but it allows a margin of error for new people who have never used these fungi.
Characteristics of golden teacher spores uk
You will get a medium-sized golden teacher mushroom from the first flush but later it becomes flatter as well as larger in comparison to earlier. Their caps become pretty plain when GTs grow to the fullest.
They are less fruiting compared to other Psilocybe cubensis but the good news is they can easily grow even under optimal conditions required for their growth. Just because of this fact, they are more popular and like by new cultivators and growers.
How Can You Grow golden teacher spores uk at Home?
I have mentioned two different techniques which you can adopt to grow golden teacher mushrooms at your home.
1) Growing Golden Teachers using Grow Kit
You can use the golden teacher shrooms grow kit. It is the best method for growers who want quick results. While using these grow kits, you must be familiar with these instructions. Famous mushrooms dealer Magic Mushroom Shop offers two different types of grow kits as given below. mushroom growing kits and auto
-
Fresh Mushroom XP mushroom grow kits
-
Mondo/MycoMate mushroom grow kit
2) Growing golden teacher spores uk
The second technique is to use golden teacher spores uk . It is the most suitable option for the people who really want a customization of the cultivation process for yield optimization. agar liquid culture lab work
The cultivation using spores is considered among advanced cultivation techniques. Advanced cultivation means growth without mycelium i.e., starting from scratch. You can find spores in multiple forms as given below.
-
Syringes
-
Vials, and
-
Prints
Advantage
The major advantage associated with the growth of golden teacher mushroom using spores is it saves money (cost-effective technique). Moreover, you can maximize your yield by optimizing the conditions.
Effects of golden teacher spores uk
Golden teachers offer mildly higher psychedelic effects that is why they are considered as a gateway for newbies. They have become more famous due to their spiritual effects and shamanistic characteristics instead of solely tripping.
After consuming golden teacher spores uk you will start getting a feeling of enlightenment. They are helpful in connecting you to nature. Their name is also derived from their special properties of healing your mind.
Step by Step Guide to Grow golden teacher spores uk
If you are planning to grow golden teacher spores uk , you must be well aware of the ingredients required for their proper growth.
Equipment Required
You need special equipment for their growth as given below.
-
Strainer
-
Perlite
-
Small nail
-
Hammer
-
Bowl for mixing
-
Micropore tape
-
Cup for measurement
-
Tinfoil (heavy duty)
-
Bottle for mist spray
-
10 paper towels (or small towel)
-
Twelve shoulderless jars with lids (half print)
-
Transparent plastic storage box (50 to 115 liters)
-
Big cooking pot having a tight lid (it is required for steaming)
-
Drill (with 0.25 inches drill bit)
Ingredients
Here I am providing you the necessary ingredients to grow golden teacher spores uk.
-
Drinking water
-
Organic rice flour (brown colored)
-
Vermiculite (fine/medium), and
-
Spore syringes (10 to 12 cc)
Hygiene Supplies
-
Air sanitizers
-
Disinfectant (for surface)
-
Rubbing alcohol
-
Surgical mask
-
Propane or butane torch lighter
-
Latex gloves (sterilized), and
-
Glovebox or still air
The surgical mask, sterilized latex gloves, and glove box or still air are optional things whereas all others are necessary.
Important Instructions
You should always keep in mind the following instructions.
-
Prepare substrate of water, brown rice flour, and vermiculite.
-
Divide this substrate among glass jars.
-
Put some spores and wait for the development of mycelium.
-
After four to five weeks, you can transfer the substrate to the fruiting section.
-
Wait until your mushrooms start to grow.
Note
Though you do not need a lot of space but your environment should be as clean as possible. You must spray sanitizer, brush your teeth, take a bath, wear clean clothes, disinfect your surfaces and equipment carefully. raw mushroom growing substrates sterilized
Step 1: Preparation
This phase consists of multiple steps including preparing jars and substrate, filling jars, steam sterilize, and cooling. I have explained all these steps below to have a better understanding.
Preparing Jars
-
Disinfect hammer and nail with alcohol.
-
Make four holes in the lid with the help of a nail and a hammer.
Preparing Substrate
-
For every jar, take 1/4 cup of water and 2/3 cup of vermiculite and mix them in a bowl.
-
Use a disinfected strainer to drain excess water.
-
For each half print jar, add 1/4 cup of brown rice flour to a bowl and combine it with (moist) vermiculite.
Filling Jars
-
Do not completely fill the jars instead maintain a little space at the top to avoid filling them so tightly.
-
Sterilize the top with the help of alcohol.
-
Introduce dry vermiculite for the insulating substrate from contaminants.
Steam Sterilize
-
Tightly close the lid
-
Use tin foil to cover the jars and secure foil edges for preventing the condensation process through the holes.
-
Place paper towels in the cooking pot and put all the jars on the top and make sure that they are not touching the base.
-
Add some tap water halfway up the corners of the jars and start boiling it slowly.
-
Put a tightly fitted lid on a pot and just leave for steam for about 75 to 90 minutes.
Note
You can also use a pressure cooker for this purpose. It will take around one hour at 15 PSI.
Allowing to Cool
-
Once the steaming is done, just leave the jars (covered from foil) in a pot for multiple hours at night.
-
Keep them at room temperature before you proceed.
Step 2: Inoculation
This phase has also two different steps e.g., sanitizing and preparing syringes and injection of spores. I’ve mentioned the details below.
Preparing and Sanitizing Syringe
-
Use some heating source (e.g., lighter) in order to heat the needle of your syringe until it becomes red after continuous heating.
-
Allow the hot needle to get cool for some time and clean it with alcohol. Avoid it touching your hand.
-
Slightly pull a plunger to evenly distribute shroom spores by shaking the syringe.
Injecting Spores
-
Remove a foil from one jar and immediately inject a syringe through a hole.
-
Insert 1/4 cc of spores’ solution with the help of a needle that is touching the side of the jar.
-
Repeat the same process for the remaining three holes.
-
Now, use micropore tape to cover the holes and set jars, and repeat this inoculation for all the jars.
Step 3: Colonization
The steps included in this phase are waiting for mycelium to develop and consolidate.
Waiting for Mycelium to Develop
Place the inoculated jars in some clean space and avoid them exposing directly to the sun. After one or two weeks, the mycelium will start appearing. It will look like a white fluffy thing and will spread outward.
Consolidation
After waiting for about a month you can have around six jars colonized successfully if everything goes well.
Leave them for another week so that the mycelium can strengthen its hold over the substrate made in step 1.
Step 4: Grow Chamber Preparation
Making a shotgun fruiting chamber and adding perlite are two different steps involved in this phase of growing golden teacher spores uk . Their details are given below.
Making a Shotgun Fruiting Chamber
-
Start carefully drilling 1/4 inches holes in your storage container, made up of plastic, all over the lid, sides, and base.
-
After successful drilling put the box on four stable objects and arrange its corners in a way to maintain an easy flow of air.
-
To prevent moisture leakage, you need to cover the bottom surface of the box.
Note
The shotgun fruiting chamber is not even closer to the best method but it gives quicker results due to which fresh growers like this technique.
Adding Perlite
-
Put perlite in the strainer and start running it under a cold tap in order to soak.
-
Allow its draining until no drips are left.
-
Now, spread that on the grow chamber’s base.
-
Repeat this for the perlite layer (four to five inches deep).
Step 5: Fruiting
This stage consists of the birthing of the colonized substrates, dunking and rolling the cakes, transferring to grow chambers, and optimizing as well as monitoring conditions. Let’s take a look at all of them.
Birthing Colonized Cakes
-
Open all the jars and remove a dry layer of vermiculite from every jar.
-
Make sure that your substrate is not damaged during this process.
-
Upend every jar tapping down onto the disinfected surface for releasing the cakes or substrate intact.
Dunking Cakes
-
In order to remove loose vermiculite, rinse cakes one at a time under the cold tap.
-
Make sure cakes are not damaged during the process.
-
Put tepid water in the cooking pot and fill it completely.
-
Allow the cakes to rehydrate at the room temperature for about a day.
Rolling Cakes
-
Separate both the water and the cakes from each other.
-
Place them over the disinfected surface.
-
Put the dry vermiculite in the mixing bowl.
-
To fully coat cakes in vermiculite, roll them one by one and it will help you guys to keep in moisture.
Transferring to Grow Chamber
-
You should cut a squared tin foil for every cake so that can be easily placed without even touching perlite from any side.
-
Put the cakes on the top and start misting the chamber with a spray bottle.
-
Before you close, do not forget to fan with a lid.
Monitoring and Optimizing Conditions
-
For keeping the humidity up, mist the chamber four times on a daily basis.
-
Ensure that your cakes are not soaking with the water.
-
Take a lid and start fanning six times on a daily basis especially, right after misting so that you can easily increase the airflow.
Step 6: Harvest
This phase consists of waiting and picking the fruits. It is considered as one of the most important stages of growing golden teacher mushroom because if everything goes fine, you can maximize your yield thereby increasing your profit. I have mentioned the details below, let’s have a deeper look at those.
Watching Fruits
-
Here, fruits mean golden teacher spores uk. Before sprouting into pins, the mushrooms will start appearing as small bumps.
-
You can harvest them after five to twelve days.
Picking Fruits/Mushrooms
-
Once the mushrooms get ready, you can cut your mushrooms close to a cake to remove.
-
You should not wait until they reach the end of their growth, it would not be a positive sign for you.
What is the Best Time to Harvest golden teacher spores uk ?
The best and recommended time for harvesting golden teach shrooms is to harvest them before their veil breaks. At the time, they consist of covered gills as well as light caps having conical shapes. substrates sterilized and raw mushroom
How Long Will it take to Grow Shrooms at Home?
According to recent research studies, it may take up to 30 to 60 days to grow your golden teacher mushrooms at home.
Major Advantage of golden teacher spores uk
A study was carried out in January 2011. It was known as “Pilot Study of Psilocybin Treatment for Anxiety in Patients with Advanced-Stage Cancer”. It had shown tremendous outcomes while treating various patients with anxiety.
When you go and search to find the biggest disease from which most the young, as well as old people, are suffering across the globe. You will find depression and anxiety at the top. So, they have become more popular to treat patients with anxiety. If you want to read in detail
Conclusion
Now, I’m sure that your guys are well aware of the facts associated with golden teacher mushrooms. I’ve tried my level best to cover most of the things that you need to know about these fungi.
Here, it’s all from today’s article on Golden Teacher Mushroom. Hope you have really enjoyed the content I produced for you. For more such informational content, stay tuned to our platform. I’ll be back very soon.